- Transformation Consulting to develop an aligned vision of current and future state, as well as a roadmap of the short and long term actions along your network transformation journey.
- Migration Plan that focuses on the specifics required to migrate from existing technologies to nbn network based connectivity.
- nbn network Readiness Assessment to evaluate the technical impact of nbn network on your existing IT services, by analysing factors such as readiness, disconnection timelines and infrastructure compatibility.
- Check action center to see if your Windows device supports Bluetooth. If it does, there'll be a Bluetooth button in action center. Make sure it's turned on.
-
If you don't see the Bluetooth button in action center, try updating your device's driver. Here's how:1Go to Start , enter Device Manager, and select it from the list of results.2In Device Manager, locate your device, press and hold (or right-click) it, select Update driver, select Search automatically for updated driver software, and then follow the rest of the steps.
-
If Bluetooth is turned on and the driver is up to date but your device still doesn't work, try removing the device and re-pairing it. Here's how:1Go to Start , enter Devices, select Bluetooth and other devices settings > select the device > Remove device > Yes.2Try pairing again.
- Make sure that the Bluetooth-enabled audio device is on and discoverable. How you do this varies with devices, so check the info that came with your device or go to the manufacturers website.
Summary
RADIUS, short for Remote Authentication Dial-In User Service, is a remote server that provides authentication and accounting facilities to various network appliances. RADIUS authentication and accounting gives the ISP or network administrator the ability to manage PPP user access and accounting from one server throughout a large network. The MikroTik RouterOS has a RADIUS client that can authenticate for HotSpot, PPP, PPPoE, PPTP, L2TP, and ISDN connections. The attributes received from the RADIUS server override the ones set in the default profile, but if some parameters are not received they are taken from the respective default profile.
The RADIUS server database is consulted only if no matching user access record is found in the router's local database.
If RADIUS accounting is enabled, accounting information is also sent to the RADIUS server default for that service.
RADIUS Client
Sub-menu: /radius |
|---|
This sub-menu allows adding/remove RADIUS clients.
The order of added items in this list is significant.
Properties
|
Property
|
Description
|
|---|---|
| accounting-backup (yes | no; Default: no) | Whether the configuration is for the backup RADIUS server |
| accounting-port (integer [1..65535]; Default: 1813) | RADIUS server port used for accounting |
| address (IPv4/IPv6 address; Default: 0.0.0.0) | IPv4 or IPv6 address of RADIUS server. |
| authentication-port (integer [1..65535]; Default: 1812) | RADIUS server port used for authentication. |
| called-id (string; Default: ) | Value depends on Point-to-Point protocol: PPPoE - service name, PPTP - server's IP address, L2TP - server's IP address. |
| certificate (string; Default: ) | Certificate file to use for communicating with RADIUS Server with RadSec enabled. |
| comment (string; Default: ) | |
| disabled (yes | no; Default: no) | |
| domain (string; Default: ) | Microsoft Windows domain of client passed to RADIUS servers that require domain validation. |
| protocol (radsec | udp; Default: udp) | Specifies the protocol to use when communicating with the RADIUS Server. |
| realm (string; Default: ) | Explicitly stated realm (user domain), so the users do not have to provide proper ISP domain name in the user name. |
| secret (string; Default: ) | The shared secret used to access the RADIUS server. |
| service (ppp|login|hotspot|wireless|dhcp; Default: ) | Router services that will use this RADIUS server:
|
| src-address (ipv4/ipv6 address; Default: 0.0.0.0) | Source IP/IPv6 address of the packets sent to the RADIUS server |
| timeout (time; Default: 100ms) | Timeout after which the request should be resent, example radius set timeout=300ms numbers=0 |
When the RADIUS server is authenticating the user with CHAP, MS-CHAPv1, MS-CHAPv2, it is not using a shared secret, the secret is used only in authentication reply, and the router is verifying it. So if you have the wrong shared secret, the RADIUS server will accept a request, but the router won't accept a reply. You can see that with /radius monitor command, the "bad-replies" number should increase whenever somebody tries to connect.
If RadSec is enabled, make sure your RADIUS Server is using "radsec" as the shared secret, otherwise, RADIUS Server will not be able to decrypt data correctly (unprintable characters). With RadSec RouterOS forces the shared secret to "radsec" regardless of what has been set manually (RFC6614).
Example
To set up a RADIUS Client for HotSpot and PPP services that will authenticate against a RADIUS Server (10.0.0.3), you need to do the following:
[admin@MikroTik] > /radius add service=hotspot,ppp address=10.0.0.3 secret=ex[admin@MikroTik] > /radius printFlags: X - disabled# SERVICE CALLED-ID DOMAIN ADDRESS SECRET0 ppp,hotspot |
To set up a RADIUS Client with RadSec, you need to do the following:
[admin@MikroTik] > /radius add service=hotspot,ppp address=10.0.0.3 secret=radsec protocol=radsec certificate=client.crt[admin@MikroTik] > /radius printFlags: X - disabled# SERVICE CALLED-ID DOMAIN ADDRESS SECRET0 ppp,hotspot 10.0.0.3 radsec |
Make sure the specified certificate is trusted.
To view RADIUS Client statistics, you need to do the following:
[admin@MikroTik] > /radius monitor 0pending: 0requests: 10accepts: 4rejects: 1resends: 15timeouts: 5bad-replies: 0last-request-rtt: 0s |
Make sure you enable RADIUS authentication for the desired services:
/ppp aaa set use-radius=yes/ip hotspot profile set default use-radius=yes |
Connection Terminating from RADIUS
|
Sub-menu: |
|---|
This facility supports unsolicited messages sent from the RADIUS server. Unsolicited messages extend RADIUS protocol commands, that allow terminating a session that has already been connected from the RADIUS server. For this purpose, DM (Disconnect-Messages) is used. Disconnect messages cause a user session to be terminated immediately.
RouterOS doesn't support POD (Packet of Disconnect) the other RADIUS access request packet that performs a similar function as Disconnect Messages
Properties
|
Property
|
Description
|
|---|---|
| accept (yes | no; Default: no) | Whether to accept the unsolicited messages |
| port (integer; Default: 1700) | The port number to listen for the requests on |
Connecting to the Router
There are two types of routers:
- With default configuration
- Without default configuration. When no specific configuration is found, IP address 192.168.88.1/24 is set on ether1 or combo1, or sfp1.
More information about the current default configuration can be found in the Quick Guide document that came with your device. The quick guide document will include information about which ports should be used to connect for the first time and how to plug in your devices.
This document describes how to set up the device from the ground up, so we will ask you to clear away all defaults.
When connecting the first time to the router with the default username admin and no password, you will be asked to reset or keep the default configuration (even if the default config has only an IP address). Since this article assumes that there is no configuration on the router you should remove it by pressing "r" on the keyboard when prompted or click on the "Remove configuration" button in WinBox.
Router without Default Configuration
If there is no default configuration on the router you have several options, but here we will use one method that suits our needs.
Connect Routers ether1 port to the WAN cable and connect your PC to ether2. Now open WinBox and look for your router in neighbor discovery. See detailed example in Winbox article.
If you see the router in the list, click on MAC address and click Connect.
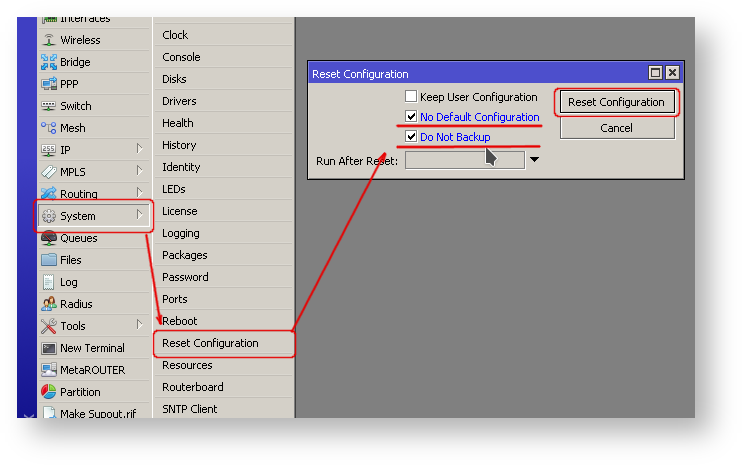
The simplest way to make sure you have absolutely clean router is to run
/system reset-configuration no-defaults=yes skip-backup=yes |
Or from WinBox (Fig. 1-1):
Configuring IP Access
Since MAC connection is not very stable, the first thing we need to do is to set up a router so that IP connectivity is available:
- add bridge interface and bridge ports;
- add an IP address to LAN interface;
- set up a DHCP server.
Set bridge and IP address are quite easy:
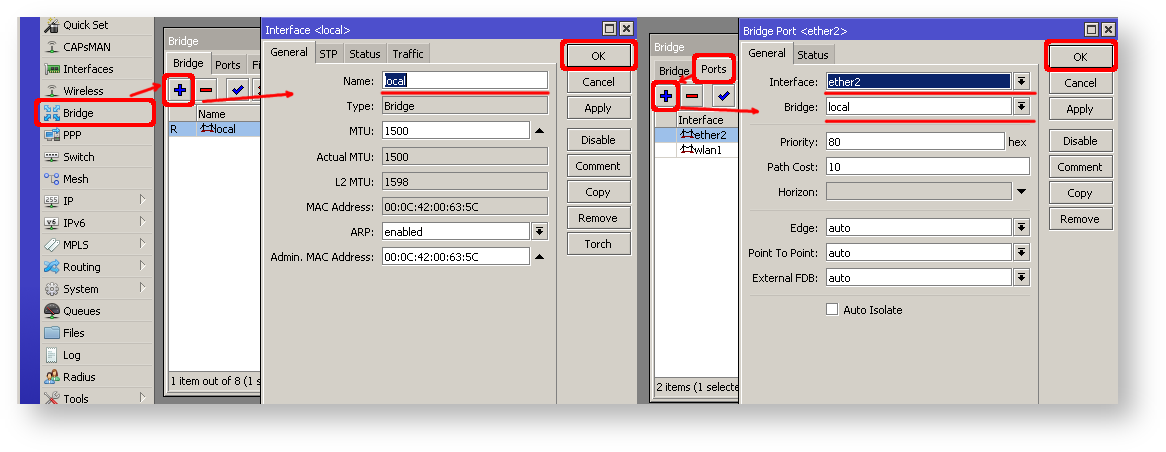
/interface bridge add name=local/interface bridge port add interface=ether2 bridge=local/ip address add address=192.168.88.1/24 interface=local |
If you prefer WinBox/WeBfig as configuration tools:
- Open Bridge window, Bridge tab should be selected;
- Click on the + button, a new dialog will open, enter bridge name local and click on OK;
- Select the Ports tab and click on the + button, a new dialog will open;
- select interface ether2 and bridge local form drop-down lists and click on the OK button to apply settings;
- You may close the bridge dialog.
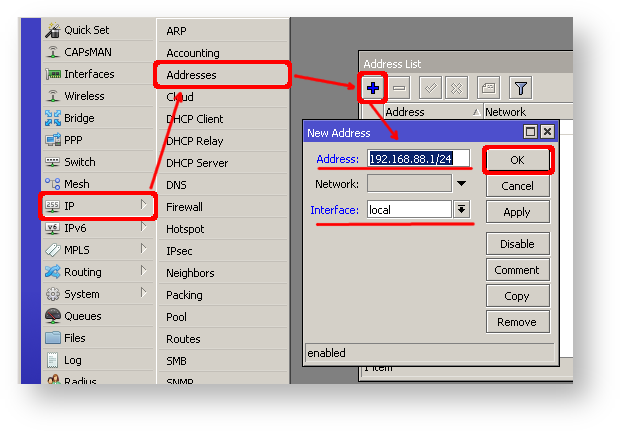
- Open Ip -> Addresses dialog;
- Click on the + button, a new dialog will open;
- Enter IP address 192.168.88.1/24 select interface local from the drop-down list and click on OK button;
The next step is to set up a DHCP server. We will run the setup command for easy and fast configuration:
[admin@MikroTik] /ip dhcp-server setup [enter]Select interface to run DHCP server ondhcp server interface: local [enter]Select network for DHCP addressesdhcp address space: 192.168.88.0/24 [enter]Select gateway for given networkgateway for dhcp network: 192.168.88.1 [enter]Select pool of ip addresses given out by DHCP serveraddresses to give out: 192.168.88.2-192.168.88.254 [enter]Select DNS serversdns servers: 192.168.88.1 [enter]Select lease timelease time: 10m [enter] |
Notice that most of the configuration options are automatically determined and you just simply need to hit the enter key.
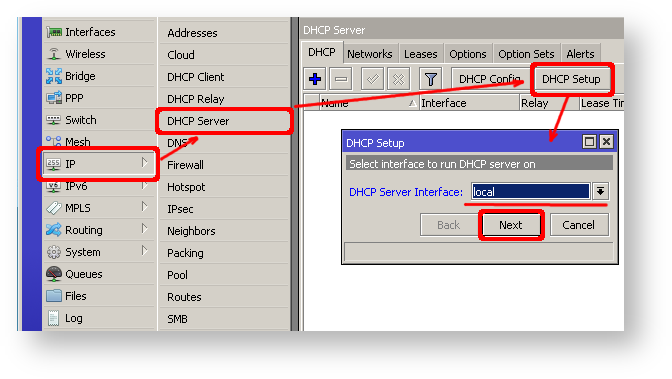
The same setup tool is also available in WinBox/WeBfig:
- Open Ip -> DHCP Server window, DHCP tab should be selected;
- Click on the DHCP Setup button, a new dialog will open, enter DHCP Server Interface local and click on Next button;
- Follow the wizard to complete the setup.
Now connected PC should be able to get a dynamic IP address. Close the Winbox and reconnect to the router using IP address (192.168.88.1)
Configuring Internet Connection
The next step is to get internet access to the router. There can be several types of internet connections, but the most common ones are:
- dynamic public IP address;
- static public IP address;
- PPPoE connection.
Dynamic Public IP
Dynamic address configuration is the simplest one. You just need to set up a DHCP client on the public interface. DHCP client will receive information from an internet service provider (ISP) and set up an IP address, DNS, NTP servers, and default route for you.
/ip dhcp-client add disabled=no interface=ether1 |
After adding the client you should see the assigned address and status should be bound
[admin@MikroTik] /ip dhcp-client> printFlags: X - disabled, I - invalid # INTERFACE USE ADD-DEFAULT-ROUTE STATUS ADDRESS 0 ether1 yes yes bound 1.2.3.100/24 |
Static Public IP
In the case of static address configuration, your ISP gives you parameters, for example:
- IP: 1.2.3.100/24
- Gateway: 1.2.3.1
- DNS: 8.8.8.8
These are three basic parameters that you need to get the internet connection working
To set this in RouterOS we will manually add an IP address, add a default route with a provided gateway, and set up a DNS server
/ip address add address=1.2.3.100/24 interface=ether1/ip route add gateway=1.2.3.1/ip dns set servers=8.8.8.8 |
PPPoE Connection
PPPoE connection also gives you a dynamic IP address and can configure dynamically DNS and default gateway. Typically service provider (ISP) gives you a username and password for the connection
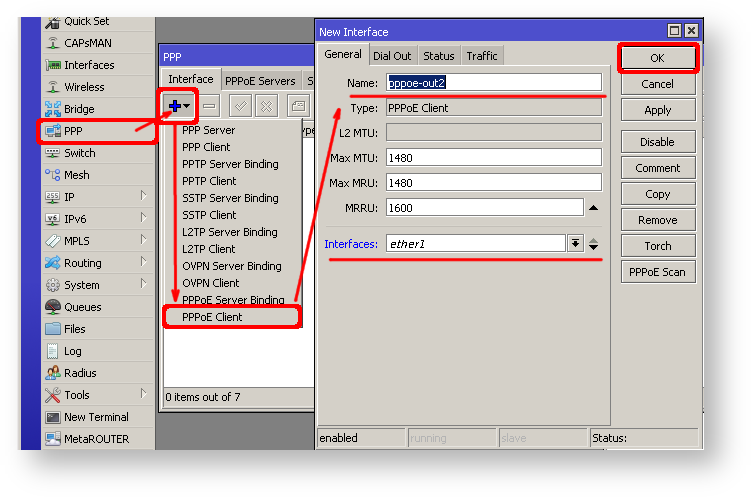
/interface pppoe-client add disabled=no interface=ether1 user=me password=123 \ add-default-route=yes use-peer-dns=yes |
Winbox/Webfig actions:
- Open PPP window, Interfaces tab should be selected;
- Click on the + button, and choose PPPoE Client from the dropdown list, new dialog will open;
- Select interface ether1 from the dropdown list and click on the OK button to apply settings.
Further in configuration WAN interface is now pppoe-out interface, not ether1.
Verify Connectivity
After successful configuration, you should be able to access the internet from the router.
Verify IP connectivity by pinging known IP address (google DNS server for example)
[admin@MikroTik] > /ping 8.8.8.8HOST SIZE TTL TIME STATUS8.8.8.8 56 47 21ms8.8.8.8 56 47 21ms |
Verify DNS request
[admin@MikroTik] > /ping www.google.comHOST SIZE TTL TIME STATUS173.194.32.49 56 55 13ms173.194.32.49 56 55 12ms |
If everything is set up correctly, ping in both cases should not fail.
In case of failure refer to the troubleshooting section
Protecting the Router
Now anyone over the world can access our router so it is the best time to protect it from intruders and basic attacks
User Password Access
MikroTik routers require password configuration, we suggest using a password generator tool to create secure and non-repeating passwords. With secure password we mean:
- Minimum 12 characters;
- Include numbers, Symbols, Capital and lower case letters;
- Is not a Dictionary Word or Combination of Dictionary Words;
/user set 0 password="!={Ba3N!40TуX+GvKBzjTLIUcx/," |
Another option to set a password,
/password |
We strongly suggest using a second method or Winbox interface to apply a new password for your router, just to keep it safe from other unauthorized access.
[admin@MikroTik] > / passwordold password:new password: ******retype new password: ****** |
Make sure you remember the password! If you forget it, there is no recovery. You will need to reinstall the router!
You can also add more users with full or limited router access in /user menu
The best practice is to add a new user with a strong password and disable or remove the default admin user.
/user add name=myname password=mypassword group=full/user remove admin |
